Nuxt.js is an open-source, progressive framework built on Vue.js that simplifies web development. It enhances Vue with versatile rendering options, including default universal rendering (SSR) for fast initial loads and strong SEO, and client-side rendering for highly interactive applications. Nuxt also supports advanced strategies like hybrid rendering to mix modes per-route.
As your Nuxt application grows, managing database changes for new features can be challenging. How do you test a feature that requires database schema changes without disrupting your live application? This is where the integration between Vercel and Neon comes in. Vercel is a deployment platform, and Neon provides a serverless Postgres database. Together, they offer seamless database branching.
When you enable the integration, every time you push a new feature branch, Vercel automatically creates a preview deployment. Simultaneously, Neon creates an isolated copy of your database just for that branch. This gives you a safe, sandboxed environment to develop and test with realistic data, without any risk to your live application.
In this guide, you will learn how to:
- Set up a Nuxt.js project and connect it to a GitHub repository.
- Install and configure the Vercel-managed Neon Integration.
- Define a database schema and manage migrations with Drizzle ORM.
- Build a full-stack Todo application with Nuxt.js server routes.
- Test the automated branching workflow: Push a new feature branch and see Vercel and Neon automatically create a sandboxed environment with its own database branch.
- Safely merge schema changes into production.
Prerequisites
Before you begin, ensure you have the following:
- Node.js
v18.0or later. - A Vercel account
- A Neon account. The Vercel integration can create one for you if you don't have one.
Initialize Nuxt.js project
First, create a new Nuxt.js application and push it to a GitHub repository, which Vercel will use for deployments.
-
Create a Nuxt.js app: Open your terminal and run the following command:
npm create nuxt nuxt-neon-vercel-todoWhen prompted, choose the following options:
- Package manager:
npm - Initialize git repository:
Yes - Install official modules:
No
You should see output similar to this:
> npm create nuxt nuxt-neon-vercel-todo Need to install the following packages: create-nuxt@3.26.0 Ok to proceed? (y) y .d$b. i$$A$$L .d$b .$$F` `$$L.$$A$$. j$$' `4$$:` `$$. j$$' .4$: `$$. j$$` .$$: `4$L :$$:____.d$$: _____.:$$: `4$$$$$$$$P` .i$$$$$$$$P` ℹ Welcome to Nuxt! nuxi 9:46:56 AM ℹ Creating a new project in nuxt-neon-vercel-todo. nuxi 9:46:58 AM ✔ Which package manager would you like to use? npm ◐ Installing dependencies... nuxi 9:47:02 AM npm WARN deprecated node-domexception@1.0.0: Use your platform's native DOMException instead npm WARN deprecated @types/parse-path@7.1.0: This is a stub types definition. parse-path provides its own type definitions, so you do not need this installed. > postinstall > nuxt prepare ✔ Types generated in .nuxt nuxi 9:48:15 AM added 751 packages, and audited 753 packages in 1m 171 packages are looking for funding run `npm fund` for details found 0 vulnerabilities ✔ Installation completed. nuxi 9:48:15 AM ✔ Initialize git repository? Yes ℹ Initializing git repository... nuxi 9:48:18 AM Initialized empty Git repository in /nuxt-neon-vercel-todo/.git/ ✔ Would you like to install any of the official modules? No - Package manager:
-
Navigate into the project directory
cd nuxt-neon-vercel-todo -
Push the initial project to a GitHub repository:
Create a new repository on GitHub (e.g.,
nuxt-neon-vercel-todo). Then, run the following commands in your terminal, replacing<your-github-repo-url>with your repository's URL.git add . git commit -m "Initial commit" git remote add origin <your-github-repo-url> git push -u origin main
To begin, you will set up the Vercel-managed Neon Integration. This is a crucial first step that provisions a Neon database and automatically injects the
DATABASE_URLenvironment variable into your Nuxt.js application. This setup streamlines both local development and Vercel deployments.-
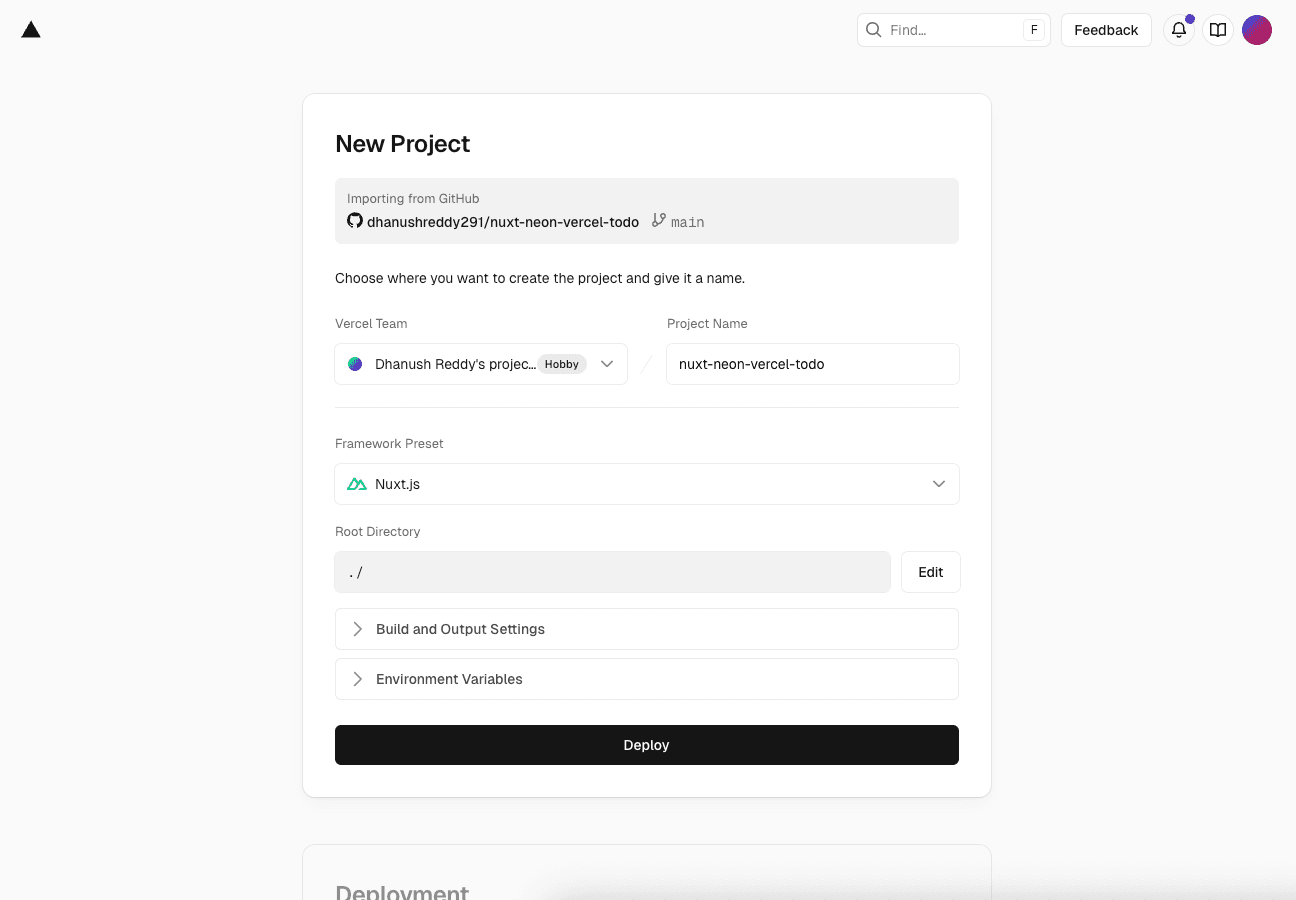
Create a Vercel project
-
Login to Vercel dashboard.
-
Click on Add New and select Project.
-
Select the GitHub repository you created earlier (
nuxt-neon-vercel-todo). -
Vercel will automatically detect that this is a Nuxt.js application and configure the build settings accordingly.
-
Click Deploy to create your Vercel project.
-
Configure the Vercel Neon integration
Install the Neon integration from the Vercel Marketplace. This process will create a Neon project and link it to your Vercel account.
- Navigate to the Neon integration page on the Vercel Marketplace and click Install.
- Accept the terms, pick a region & plan, then name your database. (Remember: a "Database" in Vercel is a Project in Neon.)
Connect the database to your Vercel project
With the integration installed, you need to connect your
nuxt-neon-vercel-todoVercel project to your new Neon database. This is where you enable the automated branching feature.- From the Storage tab in your Vercel dashboard, select your Neon database.
- Click the Connect Project tab and select your
nuxt-neon-vercel-todoproject from the dropdown. - Enable Preview Branches: In the Deployments Configuration section, ensure the Preview toggle is enabled. This is the key step that instructs Vercel to create a new Neon database branch for every Preview Deployment.
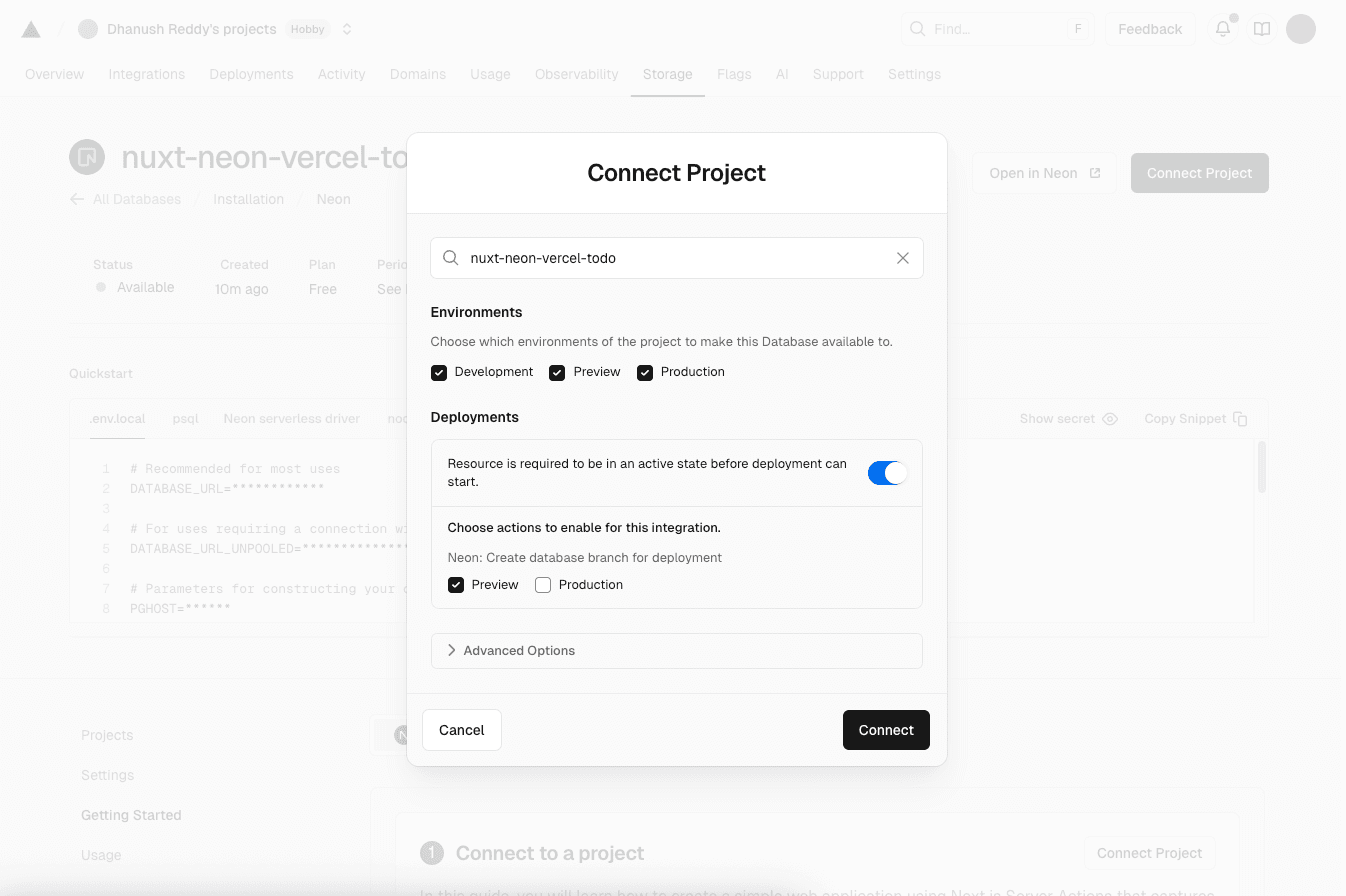
- Click Connect.
Vercel will now automatically add the
DATABASE_URLenvironment variable to your project, making it available in Production, Preview, and Development environments.Now that your Vercel project is connected to Neon, you can start defining your database schema and managing migrations.
Add database schema and migrations
To manage your database schema and migrations, you will use Drizzle ORM with the Neon serverless driver. Drizzle ORM provides a type-safe way to define your database schema and run migrations.
-
Install Drizzle dependencies
npm install drizzle-orm @neondatabase/serverless npm install -D drizzle-kit -
Define the schema:
Create a new file at
server/db/schema.tsto define thetodostable.import { pgTable, serial, text, boolean, timestamp } from 'drizzle-orm/pg-core'; export const todos = pgTable('todos', { id: serial('id').primaryKey(), text: text('text').notNull(), completed: boolean('completed').default(false).notNull(), createdAt: timestamp('created_at').defaultNow().notNull(), });The
todostable has the following fields:id: A unique identifier for each todo item.text: The text of the todo item.completed: A boolean indicating whether the todo is completed.createdAt: A timestamp for when the todo was created.
-
Configure Drizzle Kit:
Create
drizzle.config.tsin your project root. Drizzle Kit will use this to connect to your database to generate and run migrations.import { defineConfig } from 'drizzle-kit'; export default defineConfig({ schema: './server/db/schema.ts', out: './server/db/migrations', dialect: 'postgresql', dbCredentials: { url: process.env.DATABASE_URL!, }, }); -
Add migration scripts to
package.json:{ "scripts": { // ... other scripts "db:generate": "drizzle-kit generate", "db:migrate": "drizzle-kit migrate", "build": "nuxt build && npm run db:migrate" } }The build script is modified to run
db:migrateafter building the Nuxt application. This ensures that any pending migrations are applied to the database before the application starts. -
Generate the initial migration:
To run migrations locally or in the Vercel build step, you need the
DATABASE_URLavailable. Create a.envfile in your root directory.Now, go to your Vercel project's Settings -> Environment Variables, reveal the value for
DATABASE_URL, and copy it into your.envfile.DATABASE_URL="postgres://..."Now, generate your first migration file:
npm run db:generateThis creates a new SQL file in the
server/db/migrationsdirectory. -
Commit the changes: Add all the new files to git and commit them.
git add .
git commit -m "feat: setup drizzle and initial schema"
git push
Pushing to
mainwill trigger a production deployment on Vercel. Thenpm run buildcommand will executenpm run db:migrate, applying your initial migration to the main database branch.
-
Build the Todo application
With the database configured, let's build the Todo application. This will include creating server routes for CRUD operations and a simple frontend to interact with the database.
Security Note
The following code is a basic example and does not include authentication or input validation. In a production application, you should implement proper security measures to protect your API endpoints and database.
-
Create a Drizzle client utility:
Create
server/utils/db.tsto instantiate and export the Drizzle client.import { drizzle } from 'drizzle-orm/neon-http'; import { neon } from '@neondatabase/serverless'; import * as schema from '~/server/db/schema'; const sql = neon(process.env.DATABASE_URL!); export const db = drizzle(sql, { schema }); -
Create API endpoints:
Nuxt automatically scans the
server/apidirectory to create your API.-
GET
/api/todos: Createserver/api/todos.get.tsimport { db } from '~/server/utils/db'; import { todos } from '~/server/db/schema'; import { desc } from 'drizzle-orm'; export default defineEventHandler(async () => { return await db.select().from(todos).orderBy(desc(todos.createdAt)); });The
GETendpoint retrieves all todo items from the database, ordered by creation date. -
POST
/api/todos: Createserver/api/todos.post.tsimport { db } from '~/server/utils/db'; import { todos } from '~/server/db/schema'; export default defineEventHandler(async (event) => { const body = await readBody(event); const [newTodo] = await db.insert(todos).values({ text: body.text }).returning(); return newTodo; });The
POSTendpoint creates a new todo item with the provided text. -
PUT
/api/todos/:id: Createserver/api/todos/[id].put.tsimport { db } from '~/server/utils/db'; import { todos } from '~/server/db/schema'; import { eq } from 'drizzle-orm'; export default defineEventHandler(async (event) => { const id = getRouterParam(event, 'id'); const body = await readBody(event); const [updatedTodo] = await db .update(todos) .set({ completed: body.completed }) .where(eq(todos.id, Number(id))) .returning(); return updatedTodo; });The
PUTendpoint updates the completion status of a todo item by its ID. -
DELETE
/api/todos/:id: Createserver/api/todos/[id].delete.tsimport { db } from '~/server/utils/db'; import { todos } from '~/server/db/schema'; import { eq } from 'drizzle-orm'; export default defineEventHandler(async (event) => { const id = getRouterParam(event, 'id'); await db.delete(todos).where(eq(todos.id, Number(id))); return { message: 'Todo deleted' }; });The
DELETEendpoint deletes a todo item by its ID.
-
-
Build the user interface:
Replace the content of
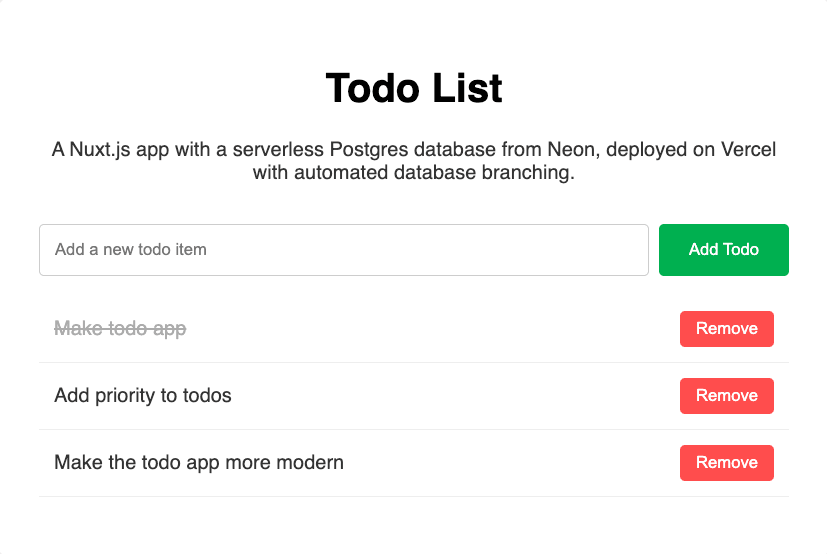
app.vuewith the following code to create frontend for the todo app.<template> <div class="container"> <h1>Todo List</h1> <p> A Nuxt.js app with a serverless Postgres database from Neon, deployed on Vercel with automated database branching. </p> <form @submit.prevent="addTodo"> <input v-model="newTodoText" placeholder="Add a new todo item" required /> <button type="submit">Add Todo</button> </form> <ul> <li v-for="todo in todos" :key="todo.id"> <span :class="{ completed: todo.completed }" @click="toggleTodo(todo)"> {{ todo.text }} </span> <button class="remove-btn" @click="removeTodo(todo)">Remove</button> </li> </ul> </div> </template> <script setup> const { data: todos, refresh } = await useFetch('/api/todos'); const newTodoText = ref(''); const addTodo = async () => { if (!newTodoText.value.trim()) return; await $fetch('/api/todos', { method: 'POST', body: { text: newTodoText.value }, }); newTodoText.value = ''; await refresh(); }; const toggleTodo = async (todo) => { await $fetch(`/api/todos/${todo.id}`, { method: 'PUT', body: { completed: !todo.completed }, }); await refresh(); }; const removeTodo = async (todo) => { await $fetch(`/api/todos/${todo.id}`, { method: 'DELETE', }); await refresh(); }; </script> <style> body { background-color: #f4f4f9; color: #333; } .container { max-width: 600px; margin: 2rem auto; font-family: sans-serif; background: #fff; padding: 2rem; border-radius: 8px; box-shadow: 0 2px 10px rgba(0, 0, 0, 0.1); } h1 { text-align: center; color: #000000; } p { text-align: center; margin-bottom: 2rem; } form { display: flex; margin-bottom: 1rem; } input { flex-grow: 1; padding: 0.75rem; border: 1px solid #ccc; border-radius: 4px; } button { padding: 0.75rem 1.5rem; border: none; background-color: #00b04f; color: white; border-radius: 4px; cursor: pointer; margin-left: 0.5rem; } ul { list-style: none; padding: 0; } li { display: flex; justify-content: space-between; align-items: center; padding: 0.75rem; border-bottom: 1px solid #eee; } li span { cursor: pointer; } .completed { text-decoration: line-through; color: #aaa; } .remove-btn { background-color: #ff4d4d; color: white; border: none; padding: 0.4rem 0.8rem; border-radius: 4px; cursor: pointer; } </style>The above code creates a simple Todo application. It includes a form to add new todos, a list to display existing todos, and buttons to toggle completion status and remove todos. It uses the API endpoints you created earlier to interact with the database.
-
Run the application locally:
Start your Nuxt.js application locally to test the functionality.
npm run devOpen your browser and navigate to http://localhost:3000. You should see your Todo application running. You can add, toggle, and remove todos, which will interact with your Neon database.
-
Commit and push the application code:
git add .
git commit -m "build: complete todo application"
git push
-
The branching workflow in action
To demonstrate the automated branching workflow, you will add a new feature to your Todo application that requires a database schema change. This will show how Vercel and Neon work together to create a safe, isolated environment for testing new features. For this example, you will add a
priorityfield to the todos.-
Create a new feature branch in git:
Run the following command to create a new branch. This will allow you to work on the new feature without affecting the main branch.
git checkout -b feature/add-priority -
Modify the database schema:
Update
server/db/schema.tsto include apriorityfield.import { pgTable, serial, text, boolean, timestamp } from 'drizzle-orm/pg-core'; import { pgTable, serial, text, boolean, timestamp, pgEnum } from 'drizzle-orm/pg-core'; export const priorityEnum = pgEnum('priority', ['low', 'medium', 'high']); export const todos = pgTable('todos', { id: serial('id').primaryKey(), text: text('text').notNull(), completed: boolean('completed').default(false).notNull(), priority: priorityEnum().default('medium').notNull(), createdAt: timestamp('created_at').defaultNow().notNull(), }); -
Generate a new migration:
Run the
db:generatecommand again. It will compare your updated schema to the database state and create a new migration file.npm run db:generate -
Update
app.vuewith the new priority field in the UI. Copy the following code to replace the existing content inapp.vue.<template> <div class="container"> <h1>Todo List</h1> <p> A Nuxt.js app with a serverless Postgres database from Neon, deployed on Vercel with automated database branching. </p> <form @submit.prevent="addTodo"> <div class="form-row"> <input v-model="newTodoText" placeholder="Add a new todo item" required /> <select v-model="newTodoPriority" class="priority-select"> <option value="low">Low Priority</option> <option value="medium">Medium Priority</option> <option value="high">High Priority</option> </select> <button type="submit">Add Todo</button> </div> </form> <ul> <li v-for="todo in todos" :key="todo.id" :class="`priority-${todo.priority}`"> <div class="todo-content"> <span :class="{ completed: todo.completed }" @click="toggleTodo(todo)"> {{ todo.text }} </span> <span class="priority-badge" :class="`priority-${todo.priority}`"> {{ todo.priority }} </span> </div> <button class="remove-btn" @click="removeTodo(todo)">Remove</button> </li> </ul> </div> </template> <script setup> const { data: todos, refresh } = await useFetch('/api/todos'); const newTodoText = ref(''); const newTodoPriority = ref('medium'); const addTodo = async () => { if (!newTodoText.value.trim()) return; await $fetch('/api/todos', { method: 'POST', body: { text: newTodoText.value, priority: newTodoPriority.value, }, }); newTodoText.value = ''; newTodoPriority.value = 'medium'; await refresh(); }; const toggleTodo = async (todo) => { await $fetch(`/api/todos/${todo.id}`, { method: 'PUT', body: { completed: !todo.completed }, }); await refresh(); }; const removeTodo = async (todo) => { await $fetch(`/api/todos/${todo.id}`, { method: 'DELETE', }); await refresh(); }; </script> <style> body { background-color: #f4f4f9; color: #333; } .container { max-width: 600px; margin: 2rem auto; font-family: sans-serif; background: #fff; padding: 2rem; border-radius: 8px; box-shadow: 0 2px 10px rgba(0, 0, 0, 0.1); } h1 { text-align: center; color: #000000; } p { text-align: center; margin-bottom: 2rem; } form { margin-bottom: 1rem; } .form-row { display: flex; gap: 0.5rem; align-items: stretch; } input { flex-grow: 1; padding: 0.75rem; border: 1px solid #ccc; border-radius: 4px; } .priority-select { padding: 0.75rem; border: 1px solid #ccc; border-radius: 4px; background: white; min-width: 140px; } button { padding: 0.75rem 1.5rem; border: none; background-color: #00b04f; color: white; border-radius: 4px; cursor: pointer; } ul { list-style: none; padding: 0; } li { display: flex; justify-content: space-between; align-items: center; padding: 0.75rem; border-bottom: 1px solid #eee; border-left: 4px solid #ddd; } li.priority-high { border-left-color: #ff4444; } li.priority-medium { border-left-color: #ffaa00; } li.priority-low { border-left-color: #44ff44; } .todo-content { display: flex; align-items: center; gap: 0.75rem; flex-grow: 1; } li span { cursor: pointer; } .completed { text-decoration: line-through; color: #aaa; } .priority-badge { font-size: 0.75rem; padding: 0.25rem 0.5rem; border-radius: 12px; text-transform: uppercase; font-weight: bold; cursor: default !important; } .priority-badge.priority-high { background-color: #ffe6e6; color: #cc0000; } .priority-badge.priority-medium { background-color: #fff3e0; color: #e65100; } .priority-badge.priority-low { background-color: #e8f5e8; color: #2e7d32; } .remove-btn { background-color: #ff4d4d; color: white; border: none; padding: 0.4rem 0.8rem; border-radius: 4px; cursor: pointer; } </style> -
Update the
server/api/todos.post.tsendpoint to handle the newpriorityfield:import { db } from '~/server/utils/db'; import { todos } from '~/server/db/schema'; export default defineEventHandler(async (event) => { const body = await readBody(event); const [newTodo] = await db .insert(todos) .values({ text: body.text, priority: body.priority || 'medium', }) .returning(); return newTodo; }); -
Push the feature branch to GitHub:
Commit the schema and migration changes and push the new branch.
git add . git commit -m "feat: add priority field to todos" git push -u origin feature/add-priority -
Check the Preview deployment:
- Vercel: Go to your project in Vercel. You will see a new Preview deployment being built for the
feature/add-prioritybranch. - Neon: Go to your project in the Neon Console and click on the Branches tab. You will see a new branch has been automatically created, named something like
preview/feature/add-priority. This branch is an instant, copy-on-write clone of your main branch.
When Vercel built the preview deployment, the
npm run buildcommand randb:migrateagainst the new preview database branch, applying the migration to add theprioritycolumn. Your preview URL is now running the new feature code against a database with the updated schema, all without touching production.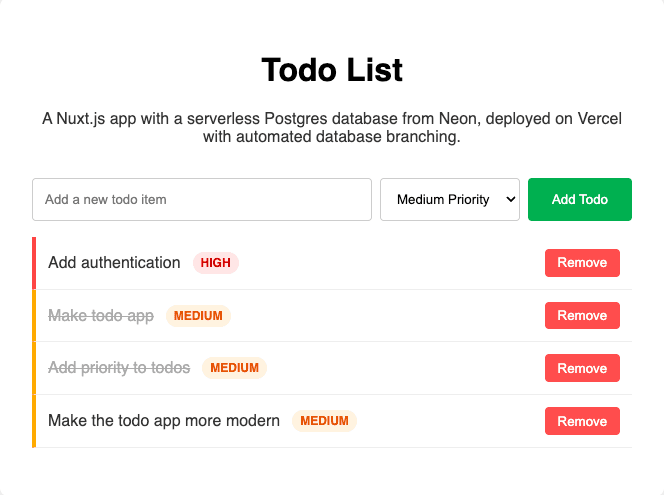
- Vercel: Go to your project in Vercel. You will see a new Preview deployment being built for the
-
Merge the pull request:
On GitHub, create and merge the pull request for your feature branch. Merging to
mainwill trigger a new Production Deployment in Vercel. The build process will run again, but this timedb:migratewill run against your main production database, safely applying the new schema change.
-
Summary
You have successfully configured a Nuxt.js application with a fully automated and safe database branching workflow. For every pull request, Vercel and Neon now work together to create an isolated preview environment, complete with its own copy-on-write database branch.
This workflow allows developers to make and test schema changes with confidence, eliminating a common bottleneck in the development lifecycle and accelerating your team's ability to ship features safely.
Resources
- Vercel-managed Neon Integration: Vercel Marketplace
- Nuxt.js Documentation: nuxt.com
- Drizzle ORM: orm.drizzle.team
- Neon Documentation: neon.tech/docs
Need help?
Join our Discord Server to ask questions or see what others are doing with Neon. For paid plan support options, see Support.